2009/03/14

Creative webcams on Debian and Ubuntu

DISCLAIMER: while we keep this post for reference, we strongly discourage the use of proprietary software, since it violates fundamental user freedoms.


Contents of the post:
  1. Creative Live! Cam Vista IM and Skype (Ubuntu 10.10+)
  2. Creative Live! Cam Vista IM (Debian Lenny e Ubuntu)
  3. Creative WebCam Live! (Ubuntu 8.10)

Creative Live! Cam Vista IM and Skype (Ubuntu 10.10+)

In order to make the webcam also compatible with Skype, one needs to install the gspca driver and libv4l.

Installing needed packages:
sudo aptitude install mercurial build-essential linux-headers libncurses5-dev
Retrieving sources (from Douglas Schilling Landgraf V4L/DVB backports repository):
hg clone http://linuxtv.org/hg/v4l-dvb/
Copy the configuration file:
cd v4l-dvb
sudo cp /boot/config-`uname -r` v4l/.config

Note: currently FireDTV drivers do not compile easily (you need all the kernel sources) and are rarely used, we will disable them in the configuration.
Launch configuration:
sudo make menuconfig
Disable FireDTV support (Multimedia Support -> DVB/ATSC adapters -> set the option blank on FireDTV and FloppyDTV):
Capture-4
Capture-5
Capture-6
Exit, Exit.
Now let’s take care of usb webcams (Multimedia Support -> Video Capture adapters -> V4L USB devices)
Activate new modules drivers (press M on those marked NEW), in gspca for example:
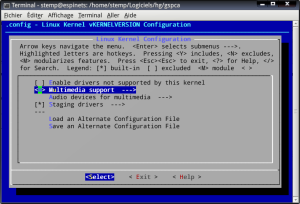
Capture-4
Capture-7
Capture-8
Capture-9
Capture-10
Once the new drivers are enabled (M for module instead of a space), we can leave. Exit, Exit, etc… and save:
Capture-11
Launch the compilation:
make
sudo make install
If everything ok go to the next step, because the drivers also require the latest versions of libv4l.
For karmic it’s easy:
sudo add-apt-repository ppa:libv4l
Get the latest version if necessary:
sudo aptitude update
sudo aptitude full-upgrade


In order to load skype with the new drivers:

cd /usr/bin
sudo mv skype skype.real
gksudo gedit skype
add the following lines

#!/bin/sh
LD_PRELOAD=/usr/lib/libv4l/v4l1compat.so /usr/bin/skype.real "$@"
and make exxecutable the file

sudo chmod +x skype
Restart and enjoy your new drivers.

Ref: Le bazar de Stemp, Ispirazioni Informatiche .

Older versions

N.B. Con i kernel 2.6.27.xx le procedure sotto riportate falliscono. Esse si riferiscono ai kernel 2.6.24.xx.


Creative Live! Cam Vista IM (Debian Lenny e Ubuntu)

Scaricare il driver ov51x-jpeg (ad esempio tramite subversion)

sudo aptitude install subversion
mkdir webcam-driver
svn co svn://rastageeks.org/svn/ov51x-jpeg/trunk webcam-driver

compilare

cd webcam-driver
sudo aptitude install linux-headers-`uname -r`
make
sudo make install
sudo modprobe ov51x-jpeg

installare il modulo del pacchetto

sudo aptitude update
sudo aptitude install ov51x-jpeg-source module-assistant
module-assistant a-i ov51x-jpeg

Per utilizzare la webcam con skype (versione 2.0.0.72) è necessario forzare un parametro all'avvio, inserendo nel file /etc/modprobe.d/options la seguente riga

options ov51x-jpeg forceblock=1

Nel caso di Ubuntu 8.04 o 9.04 è inltre necessario installare libv4l

sudo aptitude install libv4l-0


e lanciare skype con il comando

LD_PRELOAD=/usr/lib/libv4l/v4l1compat.so skype

Conviene quindi rinominare l'eseguibile

sudo mv /usr/bin/skype /usr/bin/skype.real

e creare un file

sudo nano /usr/bin/skype

inserendo la riga

LD_PRELOAD=/usr/lib/libv4l/v4l1compat.so /usr/bin/skype.real

e renderlo eseguibile

sudo chmod 775 /usr/bin/skype


Ref: ubuntu forums, rastageeks, fireteam.


Creative WebCam Live! (Ubuntu 8.10)

La Creative WebCam Live! viene riconosciuta da ubuntu 8.10 e funziona correttamente con alcuni programmi come Cheese, ma skype 2.0.0.72 , pur riconoscendola, mostra una schermata verde invece del video.
E' quindi necessario installare il pacchetto libv4l (o lib32v4l per la versione amd64)

sudo aptitude install libv4l

rimuovere skype se già installato

sudo aptitude purge skype

e installare i repository Medibuntu

sudo wget http://www.medibuntu.org/sources.list.d/intrepid.list --output-document=/etc/apt/sources.list.d/medibuntu.list

aggiungendo anche la chiave GPG

sudo apt-get update && sudo apt-get install medibuntu-keyring && sudo apt-get update

e quindi reinstallare skype da questo repository

sudo aptitude install skype


Ref: Ispirazioni Informatiche.


2009/01/12

Rete tra più PC

E' possibile condividere files tra due o più PC tramite NFS.

Dopo avere riconosciuto l'interfaccia di rete

sudo ifconfig

bisogna impostare un IP fisso su ogni computer (qui l'interfaccia è eth0):

sudo ifconfig eth0 192.168.1.1

dove l'ultimo numero deve variare a seconda del PC.


SERVER (192.168.1.1)
Installare NFS server

sudo aptitude install nfs-kernel-server nfs-common portmap

Durante la configurazione di portmap non fare il binding loopback.
Se le cartelle da condividere sono /Dati/musica in lettura e /Dati/testi in lettura e scrittura, allora aggiungere a /etc/exports le righe

/Dati/musica 192.168.1.1/24(ro,async)
/Dati/testi 192.168.1.1/24(rw,no_root_squash,async)

dove si possono anche indicare degli IP specifici invece di 192.168.1.1/24.
Riavviare il server NFS

sudo /etc/init.d/nfs-kernel-server restart

Se si cambiano le condivisione bisogna dare

sudo exportfs -a


CLIENT
Installare NFS client

sudo aptitude install portmap nfs-common

Se /media/musica e /media/testi sono le cartelle in cui montare quelle condivise, allora bisogna inserire in /etc/fstab le righe

192.168.1.1:/Dati/musica /media/musica nfs ro,user,noauto 0 0
192.168.1.1:/Dati/testi /media/testi nfs rw,user,noauto 0 0

dove ro e rw si riferiscono alle cartelle in sola lettura e in lettura/scrittura rispettivamente.
Montare le cartelle con

sudo mount /media/musica & sudo mount /media/testi

Per montarli automaticamente all'avvio utilizzare auto invece di noauto.


Ref: Senbee's Blog

2008/11/22

Risoluzione e frequenze di refresh - xorg.conf

Può succedere che gli strumenti appositi del DE utilizzato non riportino la risoluzione dello schermo desiderata, e che nemmeno il comando

sudo dpkg-reconfigure xserver-xorg

permetta di scegliere le risoluzioni. Spesso questo problema è legato alle frequenze di refresh orizzontale e/o verticale. Bisogna quindi munirsi delle specifiche del monitor (qui per Acer AC713) utilizzato e modificare /etc/X11/xorg.conf, inserendo le frequeze di refresh nella sezione monitor, e le risoluzioni desiderate in una sottosezione della sezione screen:

Section "Device"
Identifier "Configured Video Device"
EndSection

Section "Monitor"
Identifier "Configured Monitor"
HorizSync 30.0 - 72.0
VertRefresh 50.0 - 160.0
EndSection

Section "Screen"
Identifier "Default Screen"
Monitor "Configured Monitor"
Device "Configured Video Device"
SubSection "Display"
Modes "1280x1024" "1024x768" "832x624" "800x600"
EndSubSection
EndSection


Ref: forum ubuntu-it

2008/10/25

Macro root per sottrarre il fondo

La seguente macro per root (cern) crea un istogramma, sum, che è la sottrazione di due istogrammi, h2 e h2_noise, normalizzati tramite i fattori di scala scale1 e scale2 rispettivamente. h2 e h2_noise sono riempiti con i valori dei rami etichettati con ch2 nelle ntuple relative allo spettro (spectrum.root) e al fondo (noise.root) rispettivamente.


#if !defined(__CINT__) || defined(__MAKECINT__)
#include <riostream.h>
#include <stdlib.h>
#include <troot.h>
#include <tarrayi.h>
#include <tbranch.h>
#include <tcanvas.h>
#include <tclasstable.h>
#include <tclonesarray.h>
#include <tfile.h>
#include <tgeomanager.h>
#include <th1.h>
#include <th2.h>
#include <tstopwatch.h>
#include <tmath.h>
#include <tsystem.h>
#include <trandom.h>
#include <tinterpreter.h>
#include <tobject.h>
#include <tobjarray.h>
#include <ttree.h>
#include <tchain.h>
#include <tcanvas.h>
#include <tview.h>
#include <tntuple.h>
#include <tpolymarker3d.h>
#include <tfile.h>
#endif

void noise(char* infile1="sp_urto_Al.root",char* infile2="sp_urto_fondo.root", float scale1=1,float scale2=1.55)

{
float ch2;
int nentries;

TH1F *h2 =new TH1F("h2","h2",2048,0,2048);
TH1F *h2_noise =new TH1F("h2_noise","h2_noise",2048,0,2048);

TFile *fin=new TFile(infile1);
pjmca->SetBranchAddress("ch2",&ch2);
nentries=pjmca->GetEntries();
for(int i=0;i<nentries;i++){
pjmca->GetEntry(i);
h2->Fill(ch2);
}
h2->Scale(scale1);

TFile *fin=new TFile(infile2);
pjmca->SetBranchAddress("ch2",&ch2);
nentries=pjmca->GetEntries();
for(int i=0;i<nentries;i++){
pjmca->GetEntry(i);
h2_noise->Fill(ch2);
}
h2_noise->Scale(scale2);

TH1F *sum =new TH1F("sum","fondo sottratto",2048,0,2048);
sum->Add(h2,h2_noise,1,-1);


//Draw spectrum, noise, spectrum without noise:
//h2->SetLineColor(kGreen);
//h2->Draw();
//h2_noise->SetLineColor(kRed);
//h2_noise->Draw("same");
//sum->Draw("same");

//Draw spectrum without noise:
sum->Draw();
}

2008/10/16

Leggere DVD

DISCLAIMER: we strongly discourage usage of proprietary software, since it restricts fundamental user freedoms.
 
Il DVD è un formato proprietario. Per leggerlo è quindi necessario installare delle apposite librerie: libdvdcss2.
Ad esempio, con Ubuntu 7.10, si può abilitare il repository Medibuntu, scaricando la chiave per autenticare i pacchetti:

wget -q http://packages.medibuntu.org/medibuntu-key.gpg -O - | sudo apt-key add -

e aggiungendo i repository alla lista:

sudo wget http://www.medibuntu.org/sources.list.d/gutsy.list -O /etc/apt/sources.list.d/medibuntu.list

Si può quindi installare il pacchetto

sudo apt-get install libdvdcss2

In alternativa, si può eseguire lo script

sudo /usr/share/doc/libdvdread3/install-css.sh

Per leggere il dvd con vlc: File → Apri File → Disco
Selezionare DVD (menu) (così verrà visualizzato anche il menù del dvd), e quindi la periferica (ad esempio /cdrom).

Ref: Ubuntu-it: Formati proprietari, Repository non ufficiali.

2008/09/06

Broadcom wireless bcm4312 - Ubuntu 8.04

DISCLAIMER: while we keep this post for reference, we strongly discourage the use of proprietary software, since it violates fundamental user freedoms.


Installazione tramite ndiswrapper dei driver della scheda mini Dell™ Wireless 1395 802.11b/g (Broadcom wireless bcm4312) su una Ubuntu 8.04.

Individuare il chipset della periferica tramite

lspci

e reperire i driver per Windows (prefiribilmente XP), ad esempio qui

wget http://ftp.us.dell.com/network/Dell_multi-device_A17_R174291.exe

da salvare in una cartella temporanea. Installando cabextract

sudo aptitude install cabextract

si possono estrarre i driver

cabextract Dell_multi-device_A17_R174291.exe

(oppure si può utilizzare wine per eseguire il file .exe).
Nella cartella devono essere presenti il file .inf ma anche .sys e .bin (o .cat?).

Installare ndiswrapper:

sudo aptitude install ndiswrapper-utils-1.9 ndiswrapper-common

Mettere in blacklist eventuali moduli incompatibili

echo 'blacklist bcm43xx' | sudo tee -a /etc/modprobe.d/blacklist

installare i drivers

sudo ndiswrapper -i bcmwl5.inf
ndiswrapper -l


Se i driver sono stati installati correttamente, il risultato di quest'ultimo comando dovrebbe essere simile a

bcmwl5 : driver installed
device (14E4:4315) present (alternate driver: wl)

Caricare il modulo di ndiswrapper

sudo depmod -a
sudo modprobe ndiswrapper
sudo cp /etc/network/interfaces /etc/network/interfaces.orig
echo -e 'auto lo\niface lo inet loopback\n' | sudo tee /etc/network/interfaces


caricare il modulo all'avvio

sudo ndiswrapper -m
echo 'ndiswrapper' | sudo tee -a /etc/modules
echo 'ENABLED=0' | sudo tee -a /etc/default/wpasupplicant

e, nel caso fosse installato

sudo aptitude remove b43-fwcutter

Creare uno script, aprendo

gksu gedit /etc/init.d/wirelessfix.sh

e copiandovi le seguenti righe

#!/bin/bash
modprobe -r b44
modprobe -r b43
modprobe -r b43legacy
modprobe -r ssb
modprobe -r ndiswrapper
modprobe ndiswrapper
modprobe b44


Aggiustare i permessi e renderlo operativo

cd /etc/init.d/ && sudo chmod 755 wirelessfix.sh
sudo update-rc.d wirelessfix.sh defaults


Riavviare il computer e verificare che
sudo iwconfig
identifichi una nuova interfaccia (ad esempio eth1 o wlan0, ma il nome può variare).

Ref: danny block notes; wiki ubuntu-it;

2008/08/23

Trasformata Fourier di immagini

Grazie ad un plugin di gimp si possono ottenere in modo immediato le trasformate di fourier di immagini.
Bisogna installare i pacchetti fftw3 e libgimp2.0-dev per poter compilare il fourier GIMP plugin. Il README che accompagna il codice sorgente dà tutte le istruzioni necessarie per l'installazione:

# make && make install

(in realtà make è inutile, come si vede dall'output
make: Nothing to be done for 'all'
ossia non c'è bisogno di compilare, bisogna solo installare con make install)

e per utilizzare il plugin, semplicemente scegliendo dal menù principale di gimp:
Filters/Generic/Forward FFT
Filters/Generic/Inverse FFT

Ref: RP.